

How To Make Mainactivity A Template
If you've spent fourth dimension programming, you might have realized that there are some tasks you finish up completing over and over again. This may be every bit simple as creating a office or edifice upwardly a commonly used architecture. Either way, these tasks can start to feel irksome afterwards so many repetitions. Shouldn't you be using your brainpower to solve problems rather than blazon in the average lawmaking for a ViewModel again? In comes Live templates to the rescue.
Alive templates are a characteristic that JetBrains thoughtfully included in IntelliJ, and by extension, Android Studio. By using them, you can rapidly and intelligently add oftentimes used code patterns and constructs to your lawmaking, letting the IDE do the deadening piece of work for yous. This can help improve your productivity by providing some autocomplete and removing some of the cognitive burdens of average.
In this tutorial y'all'll learn how to:
- Utilize the alive templates included in Android Studio.
- Create custom templates.
- Customize your templates for your needs.
- Apply your new cognition to generate unabridged files.
Time to get started!
Getting Started
To practice using and creating live templates you'll be completing an app chosen What to Lookout. This app will show you a random trending film to take the time-consuming decision making out of your plans to watch a movie.
To get started, download the starter project using the Download Materials push at the meridian or bottom of this tutorial. Load the starter project into Android Studio and start to expect around. Looks like you can't build information technology all the same! The MainActivity hasn't implemented all the required interface methods. This is your task to complete throughout this tutorial. When you lot complete the app, it will wait like this:

This app follows a Model-View-Presenter or MVP architecture. While not the most recommended architecture, it's a great playground for practicing using live templates. The main file you'll exist working in is MainActivity.kt. Get familiar with the post-obit files before diving in:
- MainActivity.kt: This activity is the primary view of the app and implements an interface the presenter uses to instruct what to display.
- MainView.kt: This file defines the interface that the
MainActivityimplements and theMainPresentercalls. - MainPresenter.kt: This class makes API calls through the
MovieService, using the resulting data to call the view's interface methods. - MovieService.kt: Hither you utilize Retrofit to interface with the Trakt API to fetch some trending movies.
With that understood, you tin can become started building.
Generating an API Primal
As with many API's, you demand an API cardinal to use Trakt.

To start, go to trakt.telly to sign in or create an business relationship.

And then y'all need to create an app. The proper name and redirect URI are required, everything else is optional. Fill in the form, and click Save App.

Finally, copy the Client ID for your app.

Paste your client ID in app ‣ build.gradle where it says YOUR Central Hither, leaving the surrounding escaped quotation marks:
debug { // ADD YOUR API Key HERE buildConfigField "Cord", "TRAKT_API_KEY", "\"YOUR Fundamental Here\"" } This puts your primal where the MovieService tin can find it to use and observe those movies. Sync your gradle file to make this new key available.
Now y'all're all set to begin the work of finishing the MainActivity using live templates!
What is a Live Template?
As mentioned towards the beginning of this tutorial, a live template is a tool in Android Studio and IntelliJ that allows you to insert frequently used bits of code into your file. You may accept even come across some by accident before. You'll soon acquire how customizable these can exist!
You lot can use these templates anywhere you detect yourself repeating the same patterns over and over. By learning them, you tin can spend less time typing and more fourth dimension problem-solving!
Using Live Templates
To use a live template you offset past typing in that template'south abbreviation. As you type, in the same way you take code completion, you will see live template abbreviations show up in a dropdown.
Simple Templates
Pick a Kotlin file such as MainActivity.kt to practise some experimentation. At the bottom of the file, outside of the class, outset typing the abbreviation psvma. Then, once y'all take the abridgement typed or selected from the drib-downwardly, hit Tab or Enter to insert a main method.
The result should expect like this:
fun principal(args: Array<String>) { } Congrats! Y'all just used a live template! Pretty painless, huh? Practice again past using the abbreviation sout to add a print argument to your main() method.
println("Howdy World") Notice how the cursor ends in only the correct place after y'all insert the template? When you added the main() method it was in the torso of the part, and when you added the print statement it was in the parenthesis. It may seem similar motion picture magic, but in that location's a simple way to learn how this is happening.
Viewing Templates
Y'all tin can run into the list of all live templates right in Android Studio. Go to Preferences ‣ Editor ‣ Live Templates. This is where you lot can find and explore all the live templates available to you. You lot'll meet a list with collapsed items. Navigate to Kotlin ‣ psvma.

Some interesting things popped up on the bottom of the window when yous selected that abbreviation. The abridgement itself, a description, and the template text.

In the template text, you see all the code that was inserted plus the text $End$. This is a special variable that signifies where the cursor should be after the text is inserted. Non all templates have this, but you lot can see how helpful information technology is to take. If you wait at sout, you lot'll run into it there as well.
This is great, but not all code is that simple. You won't name all functions main() and not all statements are to print things. Variables are powerful things to help with this, which you'll start learning next.
Parameterized Templates
At the stop of the file again, outside any part or grade, insert the live template with the abbreviation fun2 to insert a function that takes two parameters. You lot'll see something new: the opportunity to add your own input! To add together a value for each input, type in the value, and then press Tab to movement to the next one until consummate.

Use this template to create an add() function. Use the template, and don't re-create/paste:
fun add(a: Int, b: Int): Int { return a + b } Curious how this works? Open back up the list of live templates and discover fun2 in the Kotlin listing. The template you meet will expect a lot like this:
fun $NAME$($PARAM1$ : $PARAM1TYPE$, $PARAM2$ : $PARAM2TYPE$) : $RETURN$ { $Stop$ } There are so many more places where you lot run across the pattern $<name>$. These are all variables. Unlike the special variable, $Cease$, these others are custom and allow user input. You tin can too use these to summate the value instead of having the user enter it, but more on that afterwards.
Surround Templates
1 other thing you can do with templates is surround existing code. In your add() office, highlight a + b. Hit Alt-Cmd-J or Ctrl-Alt-J on Windows to bring upwardly a popup where you can cull to surround your option with parenthesis.
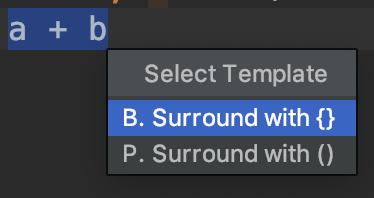
Use the arrows keys to select Surround with () from the list, and striking Enter to use it. This surrounds your highlighted code with parenthesis!
You lot can notice this template in the live template list under surround ‣ P. Similar to $END$, it uses a new special variable: $SELECTION$.
($Pick$)
This special variable can be used to environment some code with something else. You can take a await at the listing of other surround templates to get an idea of how y'all can use information technology.
Now that you have this cognition, you tin can employ information technology to finish writing the MainActivity. Delete the scrap lawmaking yous've been practicing with so you can get to the real deal.
Creating Live Templates
If you lot took a wait at MainView.kt, y'all know that in that location are a agglomeration of show/hibernate methods to implement. You might predict the torso of these methods will alter the visibility of a view, and in some cases prepare the text. That'south a lot of repetition of the same logic. You lot'd probably exist daydreaming of better times while writing that code by hand. Thankfully, y'all can brand Android Studio practice information technology for y'all subsequently a little configuration!
To think about how you might desire to create your template, you first demand to picture what you want the result to look like. Offset by imagining what the implementations of showProgress() and hideProgress() might exist:
override fun showProgress() { progress.visibility = View.VISIBLE } override fun hideProgress() { progress.visibility = View.GONE } Yous demand two methods, one that sets the visibility to VISIBLE and one that sets information technology to GONE. Open back up the live templates window to acquire how to make a template for this.
As you've seen, there are many sublists of templates. They but matter for organizational reasons, and you can create a grouping if you lot demand to. It's suggested you put your custom template nether other for this tutorial. Select other from the listing, then click the + symbol on the right to create a new alive template.

To represent show/hide view, enter shview for the abbreviation. Then, enter Add methods to testify or hide a view for the description. To kickoff building your template, paste in your final goal in the Template text box:
override fun showProgress() { progress.visibility = View.VISIBLE } override fun hideProgress() { progress.visibility = View.GONE } This is a great starting point. This is all gear up to become if you lot just desire to ever show and hide the progress view, but you can use variables to arrive more flexible.
Calculation Variables
To permit customization, yous need to use variables. These e'er take the format of $<name>$, and you lot can use whatsoever name you want other than the reserved $Stop$ and $SELECTION$.
To remember virtually where you lot might want to use variables, consider what will be consistent and what might change. You want to be able to alter the function name to friction match the view and the view ID. Modify your template to use $VIEW$ and $VIEWID$, respectively. Information technology should now look like this:
override fun show$VIEW$() { $VIEWID$.visibility = View.VISIBLE } override fun hibernate$VIEW$() { $VIEWID$.visibility = View.GONE } Discover how you're able to reuse the same variable in multiple places, both in the bear witness function and again in the hide function. This makes it then after you lot fill up it in for the beginning office, the IDE volition automatically copy it to where always the variable is duplicated.
Setting Applicable Contexts
One last affair before you can use your template. Right under the template text, there is an option to ascertain applicable contexts. Click on Ascertain and select Kotlin ‣ Class.

This tells the IDE where this template tin can exist used, in this example inside a Kotlin course. Now, this template will only be available when you're writing lawmaking inside of a class.

Click OK to save your live template. Then use your new abbreviation, shview to implement the showProgress() and hideProgress() functions in your MainActivity:
override fun showProgress() { progress.visibility = View.VISIBLE } override fun hideProgress() { progress.visibility = View.GONE } Notice that because y'all didn't employ an $Cease$ variable, your cursor was placed at the cease of the inserted code.
Annotation: If you lot're having an issue with autocomplete inserting things you don't want when trying to advance to the adjacent variable, press ESC to dismiss the suggestion before pressing Tab to advance to the next variable. You'll set this later so y'all won't demand this workaround.
Yay! Yous successfully created and used your very own alive template. You lot can utilise this template in other places, only looking at the rest of the interface you're going to need to do more piece of work. That means you get to make another template.
Creating a Complex Template
Near of the other show methods have some text as a parameter that needs to be set up on a view. Information technology makes sense, so, to create a template specifically for TextViewsouth.
Start by considering the implementations for showTitle(title: String) and hideTitle(). They might expect like this:
override fun showTitle(championship: String) { text_title.text = title text_title.visibility = View.VISIBLE } override fun hideTitle() { text_title.visibility = View.GONE } This is pretty similar to the template you made before, with the addition of setting the passed in text. Open the live template window and create some other new template. Use shtext for the abbreviation and Show/hide text view with value for the clarification. Merely as before, copy in your cease goal for show/hide championship from to a higher place so y'all tin can start modifying it.
Thinking about what variables you might want to use, you can estimate that yous'd want the aforementioned ones as your previous template. In addition, y'all need one for the String that'due south passed in. Alter your template to look like this:
override fun testify$VIEW$($VALUE$: String) { $VIEWID$.text = $VALUE$ $VIEWID$.visibility = View.VISIBLE } override fun hide$VIEW$() { $VIEWID$.visibility = View.GONE } This has the same $VIEW$ and $VIEWID$ variables you saw before. The additional $VALUE$ variable is used for that String you want to assign to the TextView.
Select Kotlin ‣ Class as the context, and click OK to save. At present utilise your new shtext template to add together the title methods to your MainActivity:
override fun showTitle(title: Cord) { text_title.text = title text_title.visibility = View.VISIBLE } override fun hideTitle() { text_title.visibility = View.GONE } Squeamish! You lot could complete the MainActivity with these templates, but in that location's nevertheless room for improvement. Continue reading to learn how!
Reordering Variables
You may be able to relate with the experience of forgetting the verbal name of a view and relying on autocomplete to assistance you lot. In this case, information technology would exist helpful to fill up in the view ID variable before the method name. Good affair there's a style to practise that!
Open upward your shtext template to edit. Next to the template text pane you'll see a push labeled Edit variables. Click it to open upward a new Edit Template Variables window here.

There are many options here, but you lot'll expect at ane of them to start: reordering. The table lists these variables in the social club they will be filled in. You want the VIEWID variable first.
If it's not already at the top of the list, select the VIEWID row. Then, utilise the arrows at the bottom of the list to motion it to the top of the list. If you lot accept a preference for the gild of the other 2 variables, you can practice reordering with those as well.
Click OK to save the variable order, then OK once again to salvage the template. Employ your updated shtext template to add these tagline methods to your MainActivity:
override fun showTagline(tagline: String) { text_tagline.text = tagline text_tagline.visibility = View.VISIBLE } override fun hideTagline() { text_tagline.visibility = View.GONE } With this template, y'all're able to fill up in the view ID first to brand sure you're using the correct name.
At that place'south even so a lot of repetition in what yous're typing, so how most trying to clear that up more than.
Reusing Variables
Because you're post-obit naming conventions, the name of the parameter is always function of the view ID. It would make sense, then, that you should just need to type this once. Considering it's a textual replacement, yous tin can use the same variable in both places, including the text_ part of the ID in the template.
Open back up your shtext template to make that change:
override fun show$VIEW$($VIEWID$: String) { text_$VIEWID$.text = $VIEWID$ text_$VIEWID$.visibility = View.VISIBLE } override fun hibernate$VIEW$() { text_$VIEWID$.visibility = View.GONE } This brings you back to having two variables to type in. You can do this because you're always following the format of text_ followed by the name in your view IDs.
Save and utilize this template to add the year methods:
override fun showYear(year: Cord) { text_year.text = twelvemonth text_year.visibility = View.VISIBLE } override fun hideYear() { text_year.visibility = View.GONE } You lost some of the autocomplete aid, simply you can solve that afterwards on.
It nonetheless feels a little silly to have to type the aforementioned word twice, once majuscule and one time lowercase. At that place'southward one more fancy pull a fast one on to use to become effectually this.
Using Predefined Functions
At that place are a few predefined functions y'all can use in your templates to make your life easier. These include things like inserting the current course proper noun and changing the case of a Cord. You lot tin can see the total listing of options in the documentation.
What you lot need for your template is the capitalize() role. You tin can pass in what you lot type for the view ID in lowercase and insert the uppercase version in the method name.
To do this, yous need to open the Edit variables window for your template. You use predefined functions in the Expression column. Add the expression capitalize(VIEWID) to the Expression column for VIEW, and press Enter.

There are three things you tin can laissez passer into predefined functions that have a parameter:
- Another variable.
- A
Stringsurrounded by quotes. - Another part.
Here, you're using the first option to pass in the VIEWID variable.
Before you save it and try it out, select the Skip if defined checkbox in the VIEW row. This says that if the value is already defined, such as if by an expression, don't ask the user to fill it in.
Click OK and save your template. Insert the overview methods to test out your changes:
override fun showOverview(overview: String) { text_overview.text = overview text_overview.visibility = View.VISIBLE } override fun hideOverview() { text_overview.visibility = View.GONE } Yay! At present you but need to blazon the name once to create these methods. Then little typing, so much code. Only one pair of methods left to implement.
Combining Functions
The last 2 interface methods you have to implement are showErrorMessage(errorMessage: String) and hideErrorMessage(). Are y'all able to spot the issue with our current template for writing these?
The method name should be PascalCase, the parameter proper noun should exist camelCase, and the view ID should be snake_case. Back to template editing to fix this!
We need all three variables again to accept all three behaviors. Revert the template text to include three variables:
override fun show$VIEW$($VALUE$: String) { text_$VIEWID$.text = $VALUE$ text_$VIEWID$.visibility = View.VISIBLE } override fun hibernate$VIEW$() { text_$VIEWID$.visibility = View.GONE } This adds that $VALUE$ variable back in.
Next, you need to edit the expressions for the variable. You tin can use both the capitalize() and camelCase() functions for this. Open up the Edit variables window.
First, make sure the VIEWID is the first variable in the list. This is the one you lot desire to blazon in with the help of autocomplete.
And then, to brand sure the parameter is camelCase, give VALUE the expression of camelCase(VIEWID). Brand sure Skip if defined is selected.
Finally, employ capitalize(camelCase(VIEWID)) for VIEW to utilize both camelCase and capitalization in the method name. Notice how you're able to pass one function to another. You should too check Skip if defined for VIEW.
In the end, your variables should look like this:

Note: Y'all can as well apply capitalize(VALUE) for VIEW considering VALUE is already camelCase.
Salve your variables and template. Try out your template past calculation the very last interface methods:
override fun showErrorMessage(errorMessage: String) { text_error_message.text = errorMessage text_error_message.visibility = View.VISIBLE } override fun hideErrorMessage() { text_error_message.visibility = View.GONE } All the capitalization is "magically" taken intendance of for you!
You lot've worked hard, and information technology's time to see your difficult work pay off. Build and run the app. Yous now take the answer to what movie y'all should watch adjacent!
Tips and Tricks
While you're all set to hit the ground running with live templates, in that location are some other tips y'all tin can acquire to go on with your new knowledge.
Default Aggrandize With
If you don't similar expending your live templates with a Tab, you lot tin can specify what other cardinal y'all'd like to use. In the live templates preferences, you can set what you want to use both for the default of all templates, as well every bit per template.

Postfix Completion
Very similar to live templates is postfix completion. You can use this by typing a . followed by the keyword in your code. At the top of showTagline(), beginning typing tagline.isBlank().if.

Select the if option and watch an if statement aggrandize before your eyes. You can use this if statement to only show the tagline if the Cord is not bare if y'all similar.
if (tagline.isBlank()) { hideTagline() return } While you can't create your ain Kotlin postfix templates at the time of this writing, yous can see the listing of available ones at Preferences ‣ Editor ‣ Full general ‣ Postfix Completion.
File Templates
Just like y'all accept a file for a argument or a method, you can have a template for an unabridged file. To run into the list of these or make your own, go to Preferences ‣ Editor ‣ File and Lawmaking Templates. The file templates work slightly different than live templates, so it'due south peachy to look at existing ones for inspiration.
Nether the Files tab, endeavour making a new one for a view interface. Click the + at the top of the listing, enter View Interface for the name and kt for the extension. Finally, add together the following to the body:
#parse("File Header.java") #if (${PACKAGE_NAME} && ${PACKAGE_NAME} != "")packet ${PACKAGE_NAME}
0 Response to "How To Make Mainactivity A Template"
Post a Comment